Inventor® Training
Master Inventor!

Constrain Inventor Splines Using Construction Lines - Page 2
Add a Spline Point
The spline will have four spline points, which will define the size and shape of the elliptical shape.
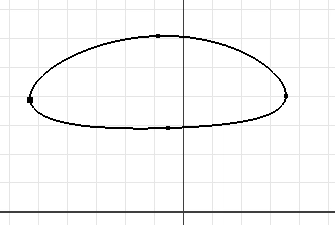
- Right click on the spline and select Insert Point.
- Place your pointer over the spline on the location for the new point.
- Click your left mouse button.
- Drag the points so that they are about equally spaced.
Constrain the geometry
As with all of your sketches, you need to fully constrain the geometry. You can add dimensions between spline points, but the best practice is to use construction lines, and then add dimensions to them. The construction lines will define the height and width of the ellipse.
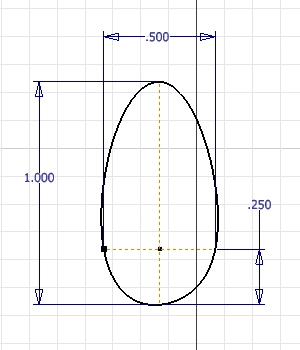
- Draw a construction line from the left point to the right point, and then add a Horizontal Constraint to the line.
- Draw a construction line from the top point to the bottom point, and then add a Vertical Constraint to the line.
- Add a Coincident Constraint to the node in the middle of the horizontal construction line and the vertical line. Be sure not to select the node in the middle of the vertical line when you do this.
- Add dimensions to the lines.
- Add a Coincident constraint to the node on the bottom of the vertical construction line and the origin.
If all went well, the profile should look almost symmetrical and the sketch should be fully constrained.
If you read my Tips and Ticks about Custom Part Templates, you know that the best practice is to use projected geometry to anchor your profiles to the sketch plane. In this example the spline was created first, so the profile was constrained to the origin last. A better approach would be to draw the construction lines first. One of the construction lines would be coincident with a projected node from the center point of the sketch, and both lines would be fully dimensioned and constrained. The final step would be to use the green snap dot to constrain the spline points to the nodes on the ends of the construction lines. When you use this method the spline will be symmetrical.
Why is this important?
The example above demonstrates how splines can be malformed when you don’t use construction geometry before drawing the spline. Anytime you draw splines you should start with construction geometry.
Algebra the Game
Teaches Algebra while you Play!
Play on any device connected to the internet.

New!
Algebra the Course - Fundamentals
Prerequisites: None, anyone can learn.
No Installation Required
Watch from any device connected to the internet.
$19.95
Algebra the Course - Fundamentals
This course makes algebra simple. It's based on skills used in Algebra the Game, and it shows you how to solve real life problems.